Ceiling Leak Water Damage in Braintree
A ceiling mark can conceal a larger wet cavity. Safe assessment starts above the room, tracing the source and checking the strength of the finish before removal or drying begins.
(888) 480-6221Plan safe overhead damage access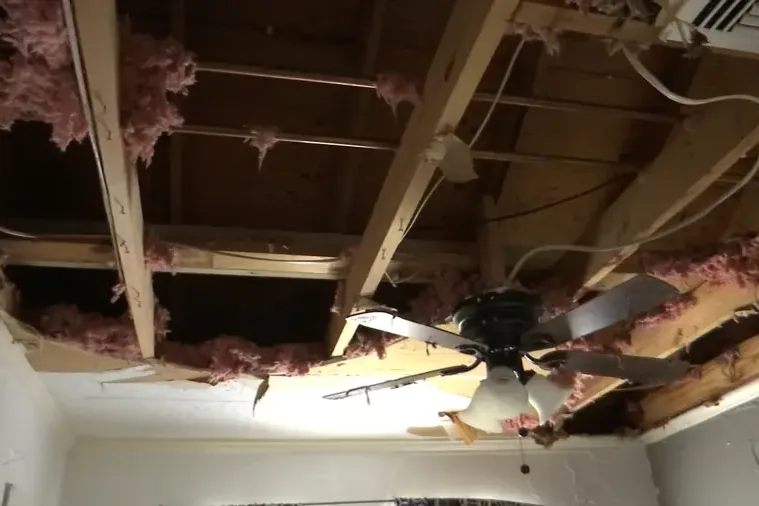
First steps for ceiling leak water damage in Braintree
- Restrict the space below
Keep occupants and belongings away from an unstable ceiling section. Do not press, puncture or stand beneath a bulge to investigate trapped overhead water.
- Describe the timing of drips
Note whether water appears during rainfall or after a fixture runs. This sequence helps the inspection trace the water back toward its entry point.
- Flag nearby electrical fixtures
Report lights, fans or other fittings near the wet area from a safe location. Electrical assessment may be necessary before ceiling access can begin.
- Protect reachable dry contents
Move dry belongings only from stable, accessible parts of the room. Wet contents below a weakened panel should remain outside ordinary occupant handling until assessed.
What does ceiling leak water damage cost in Braintree, MA?
Ceiling leak cleanup in Braintree depends on the size of the opening, insulation condition and water spread into adjoining cavities. The estimate should separate overhead removal and drying from source repair, electrical work and replacement finishes.
- Focused overhead opening
- Accessible framing checks
- Limited drying zone
- Broader panel removal
- Wet insulation handling
- Room equipment setup
- Extended concealed spread
- Additional access needs
- Multiple material readings
Cost factors: Water category, wet square footage, material class and the time before drying starts shape the scope. Access beneath cabinets, retained insulation and multiple affected levels increase the work.
Use the water damage cost calculator to compare conditions. These typical ranges are planning estimates, not a quote for the property.
How ceiling leak water damage proceeds
Assess the overhead hazard
The inspection establishes a safe work area beneath the damaged finish and identifies electrical concerns or loose material. Source observations help determine which trade needs access above. The technician also checks the floor below because drips and falling wet debris can extend the loss beyond the ceiling itself.
Open a useful inspection area
Access is chosen to reveal the wet cavity and remove weakened material safely. The assessment includes insulation, framing and adjoining ceiling edges. Findings define whether more opening is necessary, rather than using the visible stain as the automatic demolition boundary or closing the first opening before moisture is evaluated.
Dry the exposed assembly
After the source is addressed and unsuitable layers are removed, equipment serves the retained cavity and room. Airflow and humidity control are adjusted to reach the wet surfaces. Material readings track response at the exposed framing and neighboring finishes, highlighting pockets that need additional access or a changed setup.
Prepare the ceiling repair record
Documentation connects the corrected source, removed ceiling area and drying observations. Any remaining electrical or finish work is identified before replacement panels are installed. The owner can then coordinate reconstruction around the actual opening and material condition, including adjoining paint or trim work that falls outside water removal.
A growing ceiling stain changes how a room should be approached. In Braintree, overhead cleanup begins by determining whether the finish is stable and whether water has reached electrical fixtures. Occupants should remain clear of sagging sections while the source and the wet materials above the visible mark are assessed.
Describe the stain size, any sagging and the timing of drips. Mention fixtures near the wet section so the access assessment can address overhead hazards.
(888) 480-6221Plan safe overhead damage accessFollow the water above the stain
The entry point may be offset from the drip. Water can move along framing or the back of ceiling board before finding an opening. A plumbing fixture above the room, a roof entry or another source needs its own investigation. Painting the visible patch leaves that route and retained moisture unaddressed.
For a property near Pond Meadow Park, the room layout determines how the cavity can be reached. Inspection may use an existing access point or a carefully selected opening. The aim is to inspect insulation and framing while avoiding unnecessary damage to sound finishes surrounding the affected area.
- Keep people away from bulging or separating ceiling sections.
- Note whether dripping changes during rain or plumbing use.
- Describe nearby lights or other electrical fixtures without touching them.
- Check safely accessible flooring beneath the drip for secondary damage.
Decide what can remain overhead
Wet ceiling board can lose strength, while insulation may hold water against the framing. The material condition and source determine what needs removal. Simply directing a fan at the painted face may leave the cavity wet. Access must allow the retained materials to respond to the planned drying conditions.
A building around Sunset Lake may have several finishes between the source and the room. Each affected layer belongs in the assessment, including trim at the ceiling edge and walls where water has run downward. Burst pipe restoration provides the related cleanup path when a supply failure caused the overhead release.
Plan closure after the cavity assessment
Roof related entry requires source correction alongside interior work. Roof leak damage cleanup connects those tasks. Where a room near Watson Park remains wet above the ceiling, the drying record should identify the cavity and its response instead of reporting only the surface appearance below.
After suitable removal and cleaning, structural drying addresses retained framing and adjoining materials. Ceiling replacement then follows the source repair and moisture assessment. The handoff should show the exposed area, any remaining access requirements and the finish repairs needed to restore the room safely.
Ceiling Leak Water Damage and the IICRC S500 standard
Moisture measurements
The technician compares wet materials with an unaffected reference of the same kind. Surface touch alone cannot show whether the full assembly has reached its drying goal.
Equipment adjustment
The drying team records temperature and relative humidity, then adjusts airflow and dehumidification when a cavity or dense material stops improving. Equipment stays until readings support removal.
Written progress
The restoration contractor records the initial condition, removal decisions and final readings. A dated record helps the homeowner understand what remains before repairs close the affected area.
Safe work boundaries
The response team separates wet work from occupied rooms, checks equipment power requirements and keeps exit routes open. Occupants keep children and pets clear of hoses and cords.
ceiling leak water damage service in Braintree
Ceiling damage assessments cover Braintree homes around Pond Meadow Park, Sunset Lake and Watson Park, with access planned around the stability of each affected room.
The same service nearby: ceiling leak water damage in Milton, Randolph, Quincy.
Ceiling Leak Water Damage questions in Braintree, MA
Should a bulging ceiling be punctured?
Occupants should stay clear of unstable material instead of puncturing it. Water and weakened panels can fall unexpectedly, and electrical fixtures may be involved. The work area needs assessment before anyone opens or handles the damaged ceiling.
Why is the stain away from the source?
Water can travel along framing, pipes and the back of a panel before appearing below. The inspection follows that path above the finish. Repairing only the stained location may leave the actual entry point and wet cavity untreated.
Can the ceiling dry through its painted face?
That depends on the assembly and moisture location. Paint, insulation and enclosed spaces can limit drying access. Readings and inspection help decide whether retained materials can respond in place or whether selected finish removal is needed.
Does every piece of insulation need replacement?
The source, saturation and insulation condition determine the scope. Material that cannot be cleaned or dried appropriately may require removal. The assessment should define the affected section instead of assuming all insulation elsewhere in the building is damaged.
When can the room be used again?
Use depends on overhead stability, electrical safety, contamination and equipment placement. A room may remain restricted during removal or drying. The responsible contractor should explain which portions are accessible and what conditions must change before normal occupancy resumes.
Is repainting included with cleanup?
Painting and replacement ceiling finishes may be separate reconstruction work. The cleanup scope should identify removal, drying and documentation clearly. The finish contractor then uses the source repair and moisture assessment to plan patching, preparation and decoration.
Related water damage services in Braintree
Make the cavity ready for repair
Source correction and accessible drying help resolve the materials above a damaged ceiling before closure.