Ceiling Leak Water Damage in Randolph
A ceiling stain marks where water became visible, not necessarily where it entered. Overhead assessment traces the source, checks unstable finishes and identifies wet materials above the room.
(888) 480-6221Describe the ceiling change safely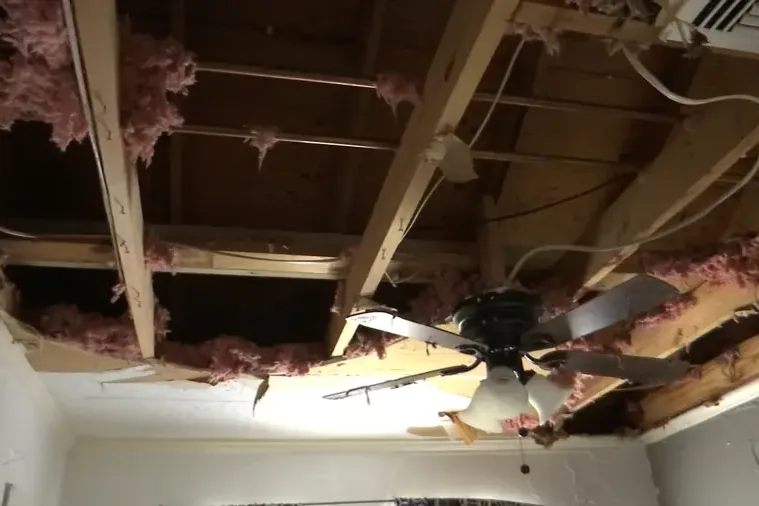
First steps for ceiling leak water damage in Randolph
- Move activity away from overhead damage
The space beneath sagging, dripping or softened ceiling material should remain clear while safe access and the condition of the overhead assembly are assessed.
- Describe the room above
Report whether the affected ceiling is below another occupied room or attic space, along with any fixture use or rainfall associated with the visible change.
- Leave electrical components alone
A wet light fitting or nearby device needs qualified assessment; occupants should avoid touching it or trying to investigate the cavity through the fixture opening.
- Photograph from a protected position
Images taken outside the affected area can document the stain, sag or drip location without requiring anyone to stand directly beneath an unstable ceiling section.
What does ceiling leak water damage cost in Randolph, MA?
Ceiling leak restoration in Randolph depends on safe overhead access, the size of the affected cavity and retained moisture. These ranges cover planning for interior damage; source repairs and electrical work need distinct descriptions in the project scope.
- Localized opening assessment
- Nearby framing checks
- Focused cavity drying
- Broader finish removal
- Wet insulation handling
- Room protection needs
- Extended moisture tracing
- Multiple drying surfaces
- Detailed closure handoff
Cost factors: Water category, wet square footage, material class and the time before drying starts shape the scope. Access beneath cabinets, retained insulation and multiple affected levels increase the work.
Use the water damage cost calculator to compare conditions. These typical ranges are planning estimates, not a quote for the property.
How ceiling leak water damage proceeds
Establish the overhead boundary
The inspection considers the stability of the ceiling surface, water near electrical components and the route into the cavity. The room below is arranged to keep people and movable contents away from the affected area. Access is planned before removal of any unstable finish begins.
Identify the source and wet layers
The assessment follows the moisture above the visible mark and checks the materials along that path. Plumbing, roof and fixture findings help identify the responsible repair trade. Insulation and framing are evaluated separately because they can retain water differently even within the same small ceiling opening.
Open and dry with a purpose
Damaged finishes or wet insulation are removed when needed for safe access and effective drying. Retained materials receive airflow and dehumidification suited to the cavity. The equipment arrangement should reach the actual wet surfaces rather than simply circulate air through the occupied room beneath them.
Provide a closing condition record
Moisture readings and source repair information support the handoff for ceiling replacement. Any unresolved electrical or repair concern remains identified in the scope. The final finish work should restore the surface only after the retained cavity materials are ready to be enclosed and the leak has been corrected.
A changing ceiling deserves attention before paint or patching hides the mark. In Randolph, ceiling leak restoration examines the space above the finish as well as the room below. Water may arrive from plumbing, a fixture or the roof, and each source needs its own correction before interior repairs can hold.
Explain the ceiling's visible change, the room above it and any nearby electrical fixture. Those details help establish the right starting point for an overhead assessment.
(888) 480-6221Describe the ceiling change safelyMake the room below safe first
A bulge, softened board or active drip near a light fixture calls for restricted entry beneath the affected area. Occupants should avoid puncturing a swollen ceiling or reaching into a wet fixture. The inspection establishes how overhead materials can be accessed without exposing people to falling debris or electrical hazards.
Tower Hill is near High Street and Lafayette Street. For a property in that area, a ceiling damage request should identify the affected room and what sits above it. Details about an upper bathroom, attic access or visible roof entry help direct the source investigation without requiring unsafe inspection by occupants.
Inspect beyond the stain boundary
- Check surrounding ceiling surfaces for softness or spreading discoloration.
- Trace moisture along framing rather than only below the drip.
- Assess insulation that may hold water above an intact finish.
- Document wet walls where overhead water reaches the room perimeter.
A ceiling opening may reveal that the wet assembly extends past the visible mark. The removal boundary should follow material condition and access needs. A small stain can coexist with wet insulation above it, while an older dry mark may require a different assessment from an active leak.
The town lists plumbing and electrical work among activities that may need approval. Source repair and electrical assessment should therefore be coordinated with the proposed interior work. Drying equipment does not replace either task when the leak is active or wet electrical components remain in the cavity.
Restore the cavity before its appearance
When the source is overhead plumbing, burst pipe cleanup may address connected damage. Rain entering above the room belongs in a roof leak assessment. The distinction shapes who corrects the source and which surrounding materials need inspection.
Retained framing and other accessible layers then move into structural drying. The handoff for replacement ceiling material should include moisture findings and remaining repairs. Finishing work can restore the room's appearance after the wet assembly and the original entry path have been addressed.
Ceiling Leak Water Damage and the IICRC S500 standard
Moisture measurements
The technician compares wet materials with an unaffected reference of the same kind. Surface touch alone cannot show whether the full assembly has reached its drying goal.
Equipment adjustment
The drying team records temperature and relative humidity, then adjusts airflow and dehumidification when a cavity or dense material stops improving. Equipment stays until readings support removal.
Written progress
The restoration contractor records the initial condition, removal decisions and final readings. A dated record helps the homeowner understand what remains before repairs close the affected area.
Safe work boundaries
The response team separates wet work from occupied rooms, checks equipment power requirements and keeps exit routes open. Occupants keep children and pets clear of hoses and cords.
ceiling leak water damage service in Randolph
Ceiling damage assessments serve properties around Tower Hill, High Street and Lafayette Street, with attention to overhead access, occupied rooms and connected wet wall surfaces.
The same service nearby: ceiling leak water damage in Milton, Braintree, Canton.
Ceiling Leak Water Damage questions in Randolph, MA
Should a bulging ceiling be drained by an occupant?
A swollen ceiling can release water and debris unpredictably. The area beneath should remain clear until the assembly is assessed. Puncturing the finish can expose occupants to falling material or wet electrical components concealed above the room.
Can water move away from the leak source?
Water may travel along framing or other surfaces before it reaches a visible opening. The stain therefore helps locate damage but may sit away from the entry point. Inspection should trace the wet path above and around the marked area.
Does dry paint mean the cavity is ready?
The exposed finish can appear dry while insulation or framing above it remains wet. Moisture readings and cavity inspection provide a better basis for closure. Painting should follow source correction and a suitable assessment of the retained materials inside.
Who checks a wet ceiling light?
A qualified electrical professional should assess water affected electrical components. Restoration handles damaged building materials and drying access, while electrical safety remains a separate concern. The two tasks should be coordinated before equipment or replacement finishes are installed near the opening.
Will all insulation above the room be removed?
The extent depends on the water path, material condition and accessibility. Inspection identifies the affected portion and whether it can remain. The removal scope should follow those findings rather than automatically treating every concealed section of the ceiling as equally wet.
What helps distinguish a roof leak from plumbing?
The timing of the leak, use of fixtures above the room and inspection of the upper space can help identify its origin. Each suspected source needs direct assessment. Cleanup then follows the wet materials while the appropriate trade corrects the entry.
Related water damage services in Randolph
Inspect above the stain before patching
Plan ceiling cleanup around safe access, wet cavity materials and a corrected source.